Back to VS Code home
When you map data via the user interface, the Data Mapper generates the required Ballerina source code. Since the Ballerina source code is the single source of truth for the Visual Data Mapper, it also lets you open and edit the existing data mappings made via the source code without changing the user experience.
Sample use case
The below is a simple use case in which you will input data of people and courses in a specific structure, convert, and transform those to a different format.
Create three files with the sample data below in JSON format.
Input 1: Person
{ "id": "1001", "firstName": "Vinnie", "lastName": "Hickman", "age": 15, "country": "UK" }
Input 2: Course
{ "id": "CS6002", "name": "Computation Structures", "credits": 4 }
Output
{ "id": "1001F", "fullName": "Vinnie Hickman", "age": "15", "courses": [ {"title": "CS6002 - Computation Structures", "credits": 4}, {"title": "CS6003 - Circuits and Electronics", "credits": 3}, {"title": "CS6004 - Signals and Systems", "credits": 3} ], "totalCredits": 10, "visaType": "D tier-4" }
The following is the source associated with this guide along with a main function to invoke the transformation function with some sample data.
import ballerina/io; type Person record { string id; string firstName; string lastName; int age; string country; }; type Course record { string id; string name; int credits; }; type Student record { string id; string fullName; string age; record { string title; int credits; }[] courses; int totalCredits; string visaType; }; const D_TIER_4_VISA = "D tier-4"; var totalCredits = function(int total, record {string id; string name; int credits;} course) returns int => total + (course.id.startsWith("CS") ? course.credits : 0); function transform(Person person, Course[] courses) returns Student => let var isForeign = person.country != "LK" in { id: person.id + (isForeign ? "F" : ""), age: person.age.toString(), fullName: person.firstName + " " + person.lastName, courses: from var coursesItem in courses where coursesItem.id.startsWith("CS") select { title: coursesItem.id + " - " + coursesItem.name, credits: coursesItem.credits }, visaType: isForeign ? D_TIER_4_VISA : "n/a", totalCredits: courses.reduce(totalCredits, 0) }; public function main() { Person person = { id: "1001", firstName: "Vinnie", lastName: "Hickman", age: 15, country: "UK" }; Course[] courses = [ { id: "CS6002", name: "Computation Structures", credits: 4 }, { id: "CS6003", name: "Circuits and Electronics", credits: 3 }, { id: "CM1001", name: "Computational Statistics", credits: 4 }, { id: "CS6004", name: "Signals and Systems", credits: 3 } ]; Student student = transform(person, courses); io:println(student); }
Open the Data Mapper
Use either of the methods below to open the Data Mapper.
Open via the CodeLens
Follow the steps below to open the Data Mapper via the Visualize CodeLens.
-
Add the code below to the
main.balfile of the package to define an empty expression-bodied function.Info: The preferred way to model the transformation logic in Ballerina is via expression-bodied functions. The expression-bodied function below will simply return nil. The function body of it is an expression, which will return a nil value.
function name() => (); -
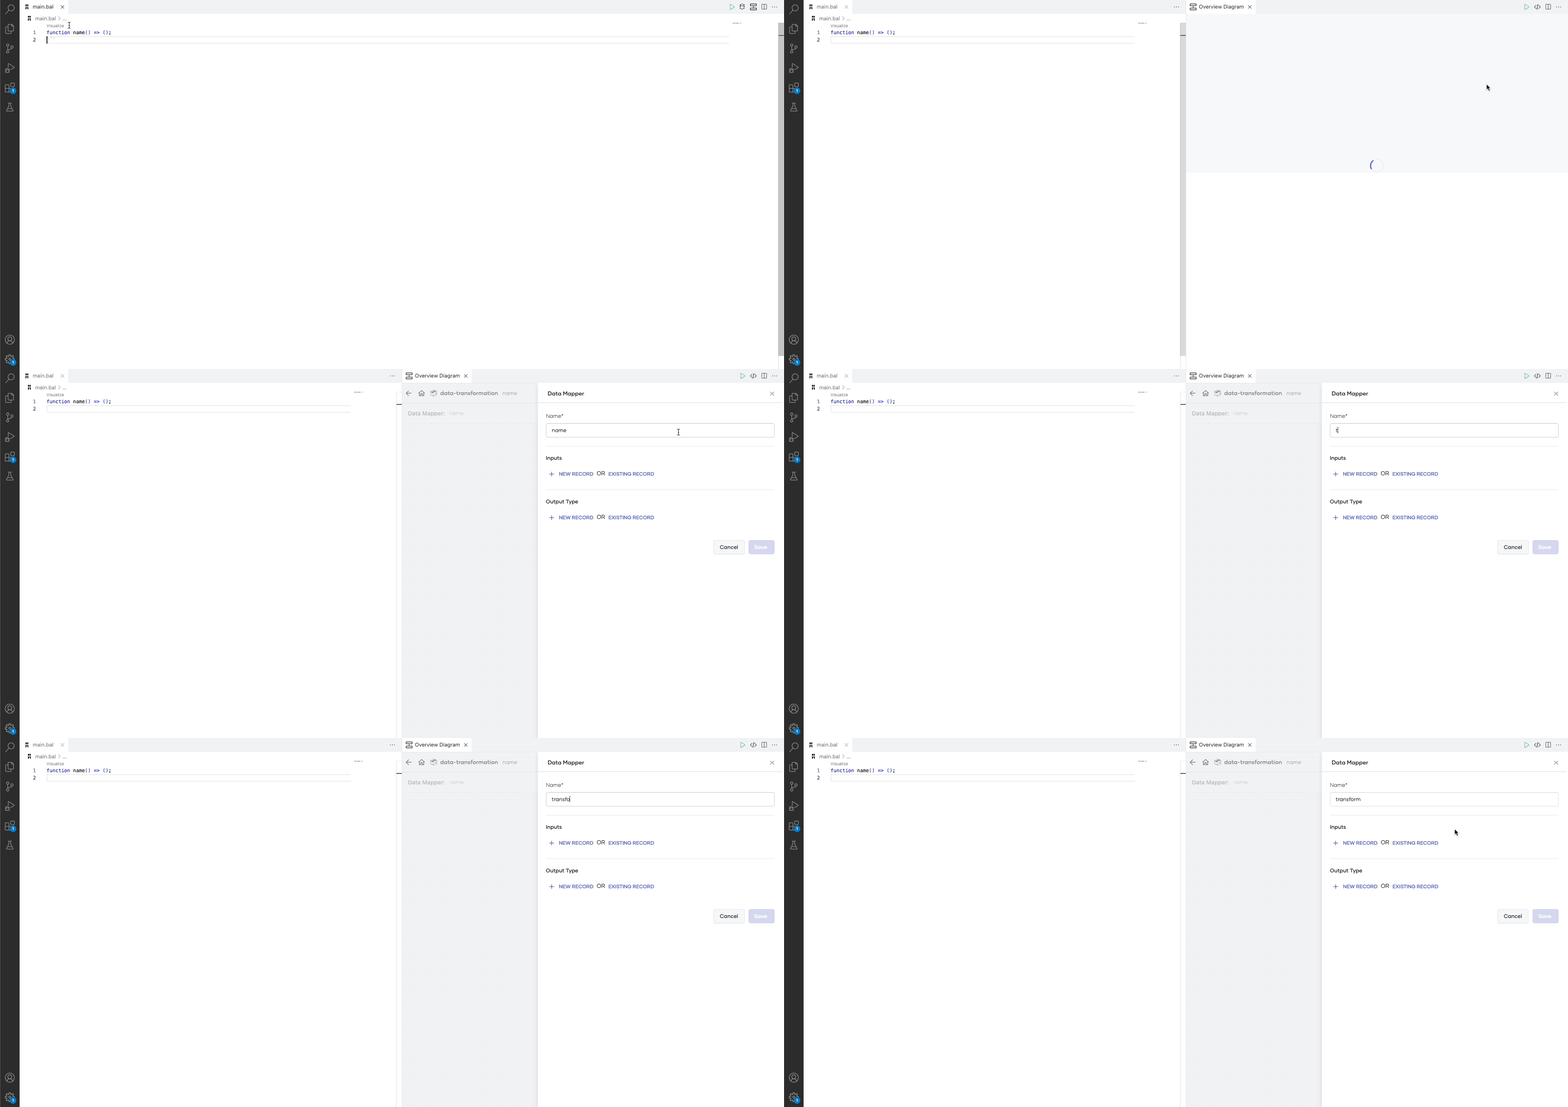
Click the Visualize CodeLens displayed on top of the function to go to the Data Mapper view.
Open via the Ballerina Visualizer View
Follow the steps below to open the Data Mapper via the Ballerina Visualizer View.
-
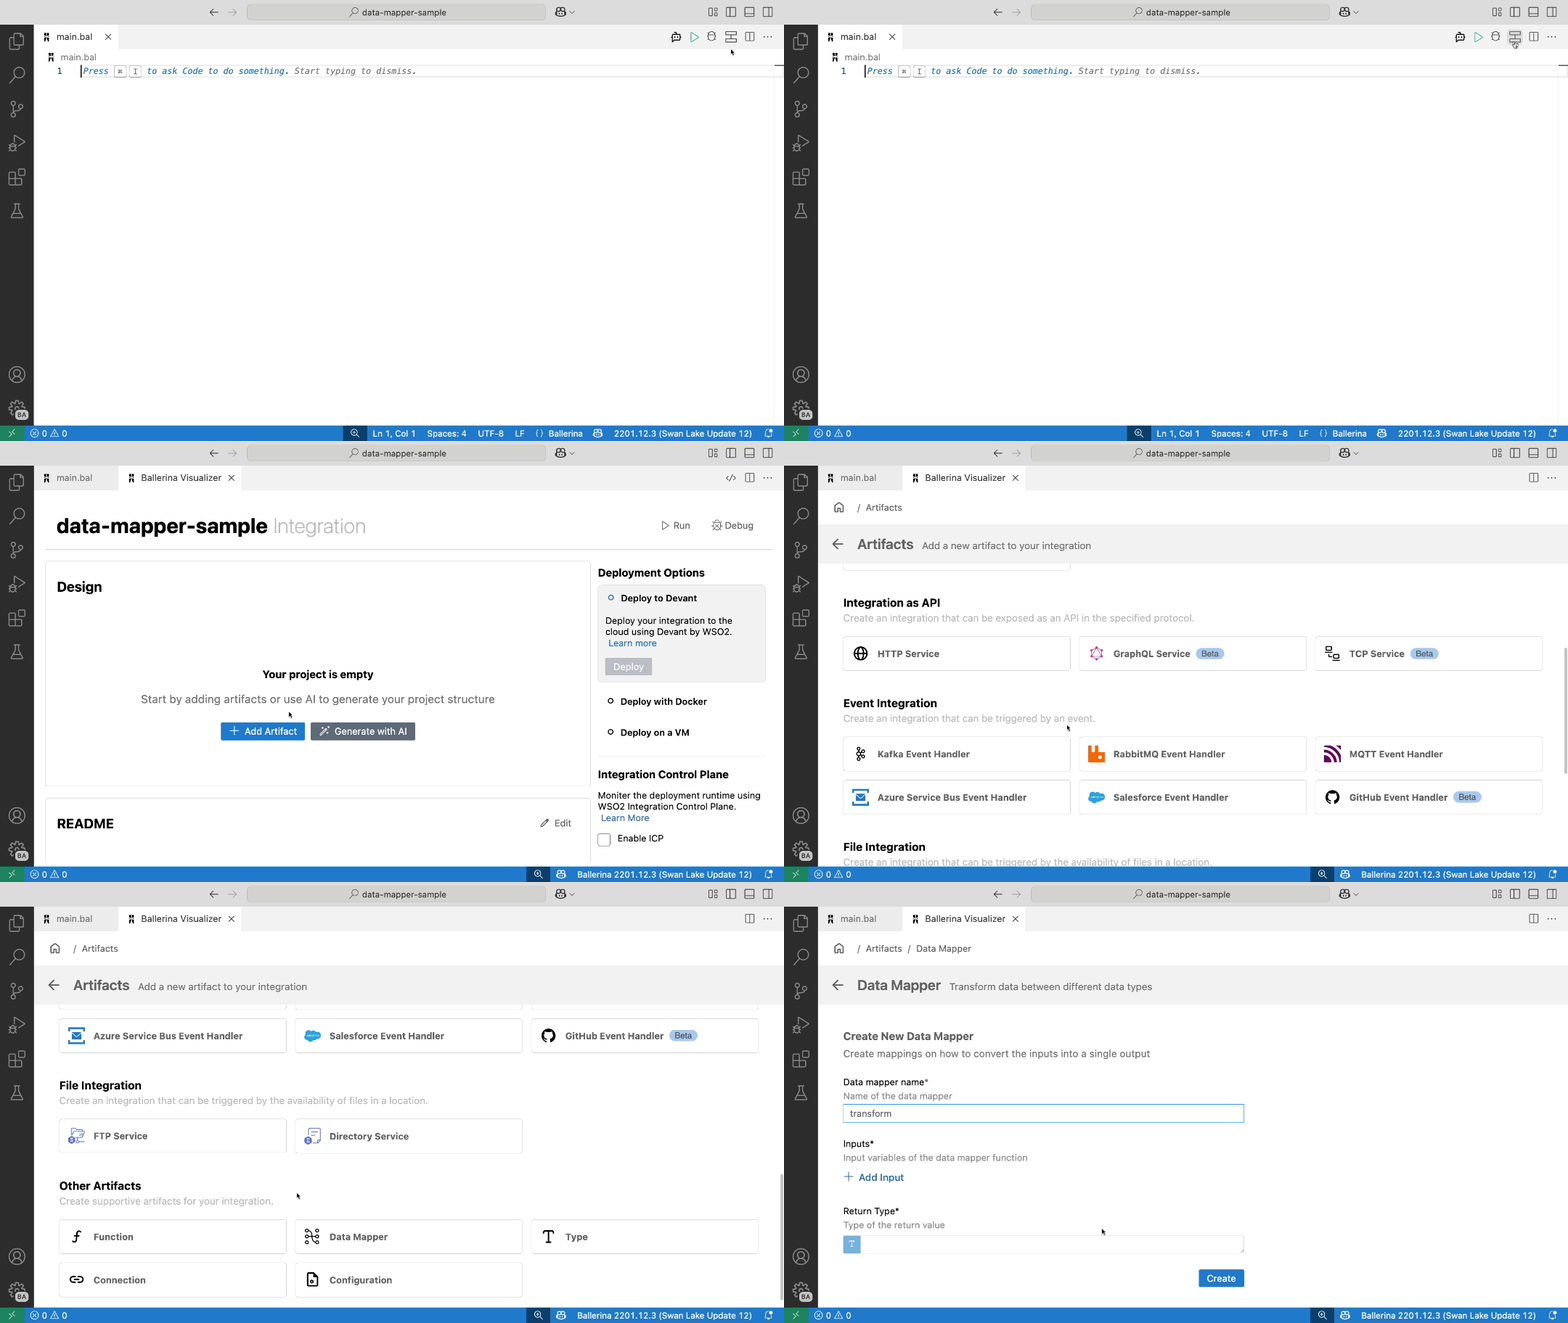
Open the Ballerina Visualizer.
-
Click the + Add Artifact button.
-
Click Data Mapper under the Other Artifcats section.
Provide inputs and output
Once the Data mapper is opened, it will prompt you to provide inputs and output of the transformation function. Inputs and output can be any data type in Ballerina. This example converts JSON and an array of JSON to JSON, and thereby, you can use Ballerina record types as inputs and output.
In the Data Mapper form, you have several options to provide the input and output records. If the records are already defined in your package, you can select one of those. If you are starting from scratch, you can either create the record from the Record Editor view or import a JSON to create a matching record.
This example imports JSON files and creates the records as shown below.
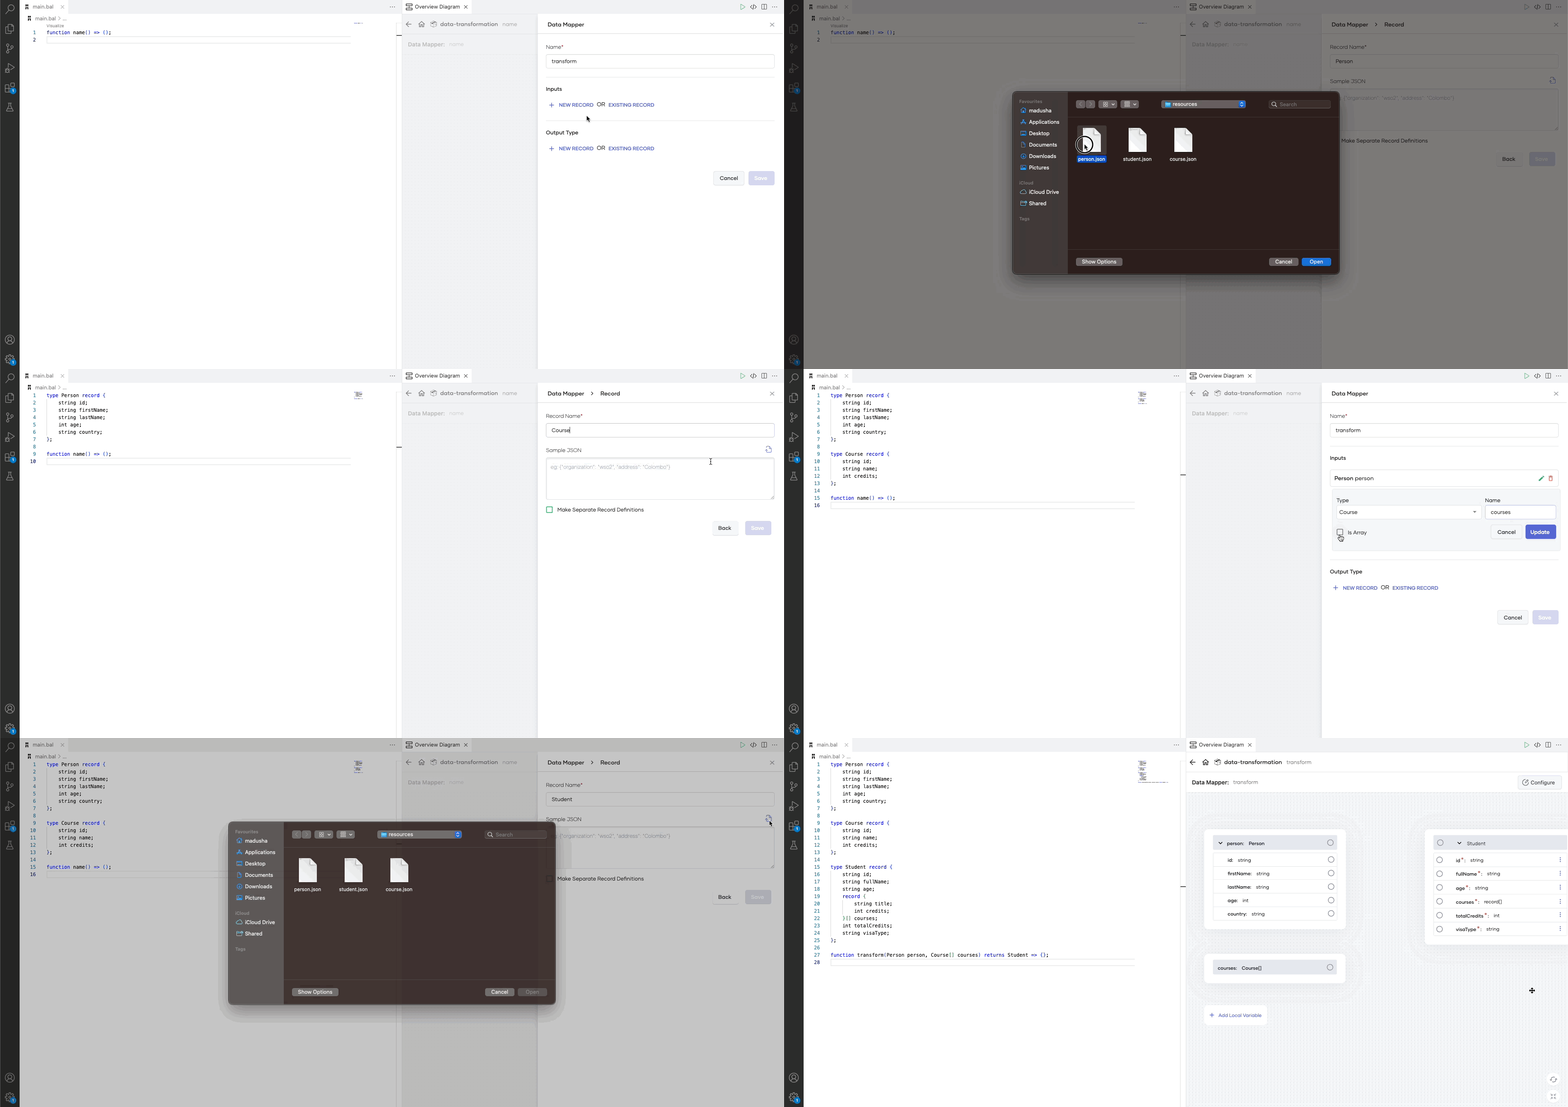
Once you define the input and the output types, click Save to open the mapping view.
Define the mappings
Map the input fields with the fields in the JSON output as described below.
Basic mapping
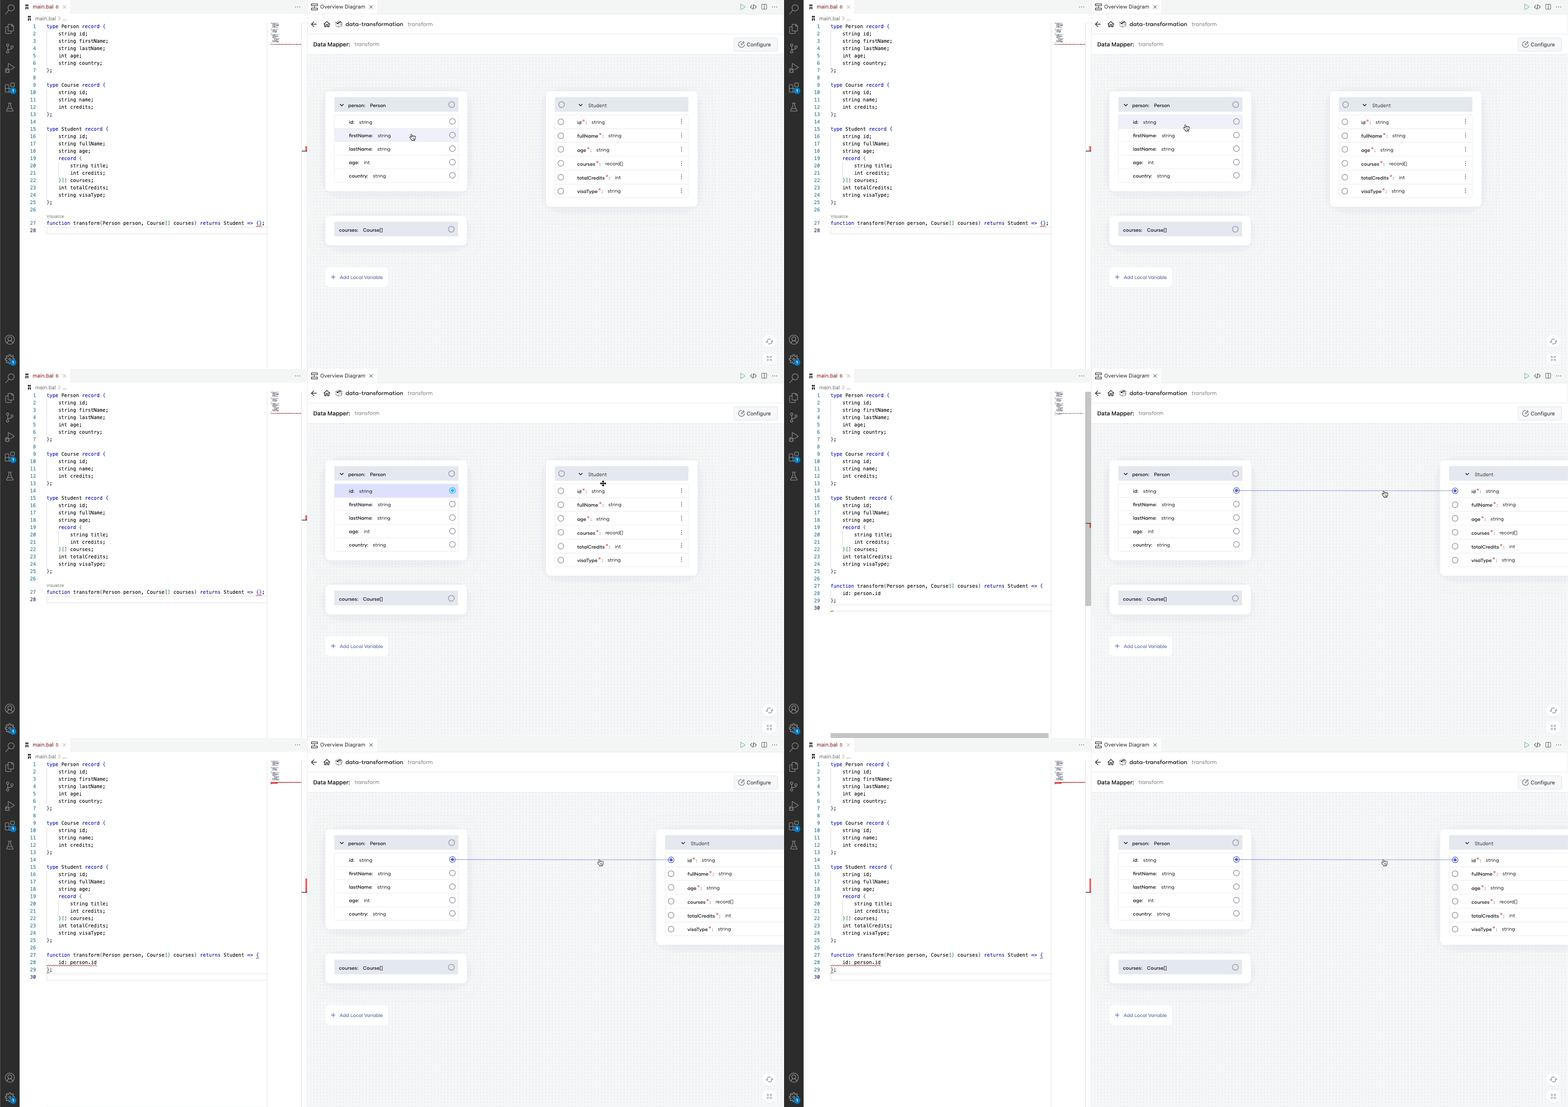
Map the person id to the student id as shown below.
Info: The mapping view will have the Inputs on the left-hand side of the UI and the Output on the right. To map the fields, click on the input field and then, click the output field. If the input and output fields are compatible and can be mapped directly, you will see a solid line connecting them.
Diagnose and fix mapping errors
Use the toBalString lang lib function to convert the int to string as shown below.
Info: When you map the input fields to output fields, some of them might not be compatible due to type mismatch. In this example, if you map the
person ageto thestudent age, it will result in a type mismatch error since theinput agetype is an integer and theoutput agetype is a string. The Data Mapper will connect the two fields with a red line and show an alert sign. You can see the error by hovering over the alert sign. It will show theincompatible types: expected 'string', found 'int'error. To fix the error, hover over the alert sign and click Fix by editing expression. Then, the Data Mapper will open the expression editor for the specific expression. You can modify the expression using it to return a string.
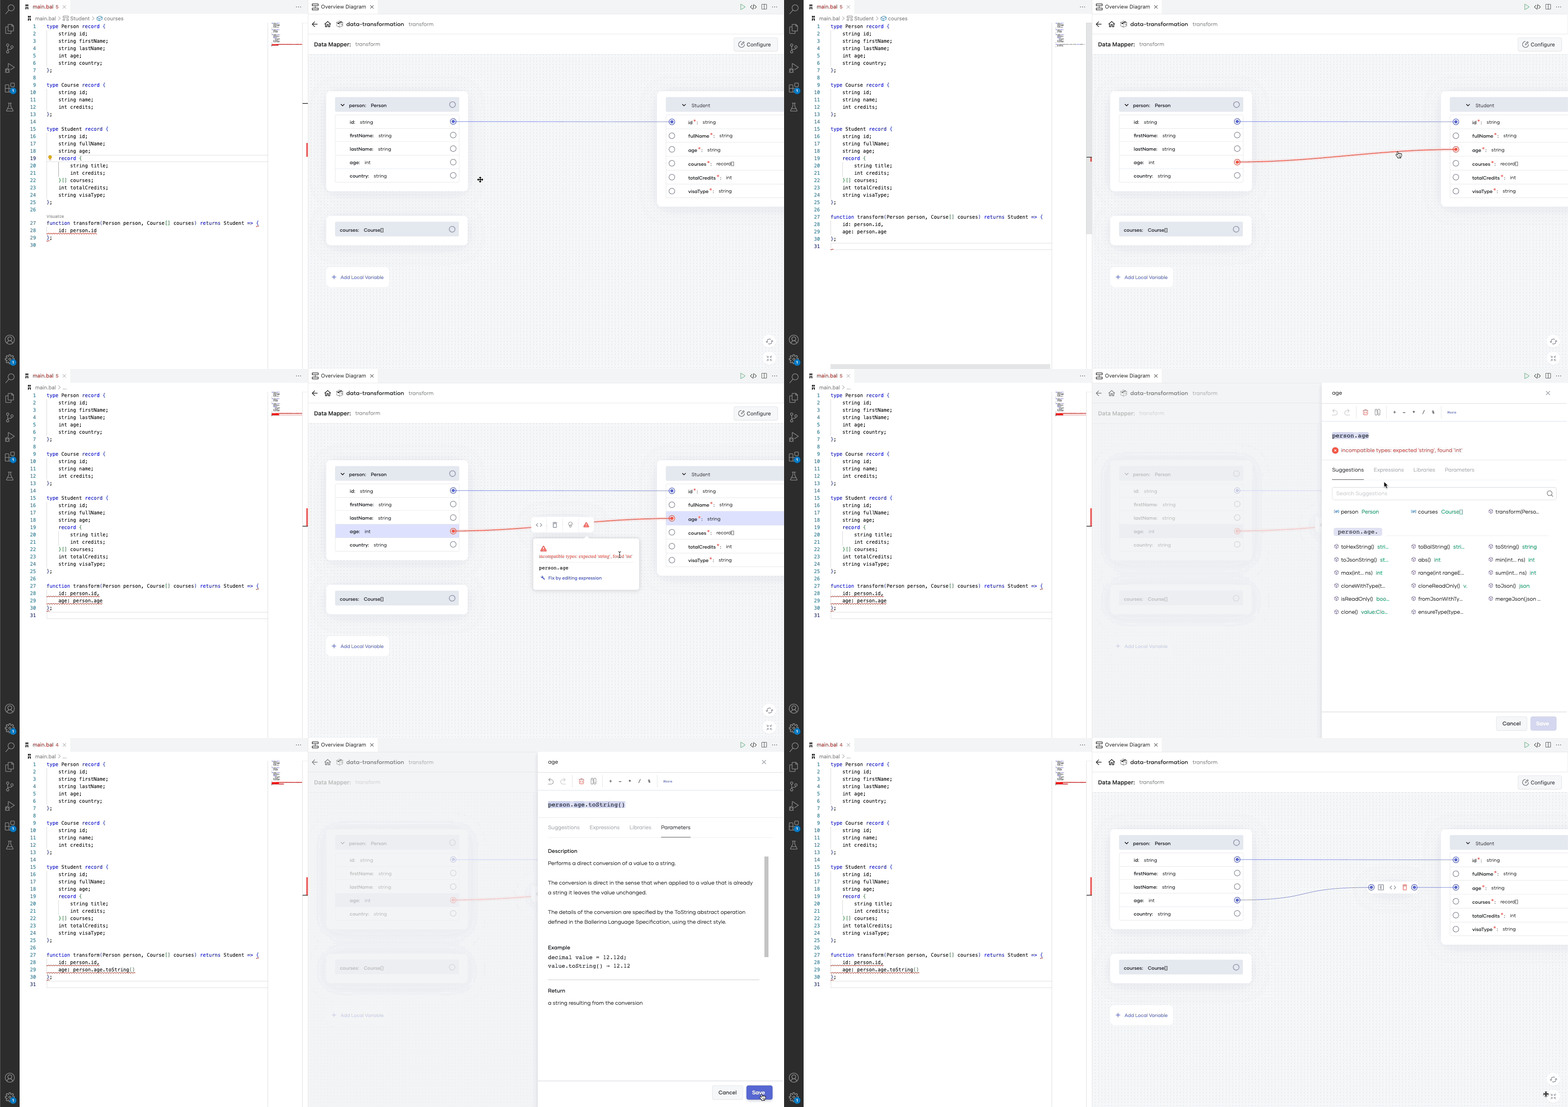
Info: Once you fix the error, the connection appears in blue to indicate that there are no errors.
Aggregate input and output fields
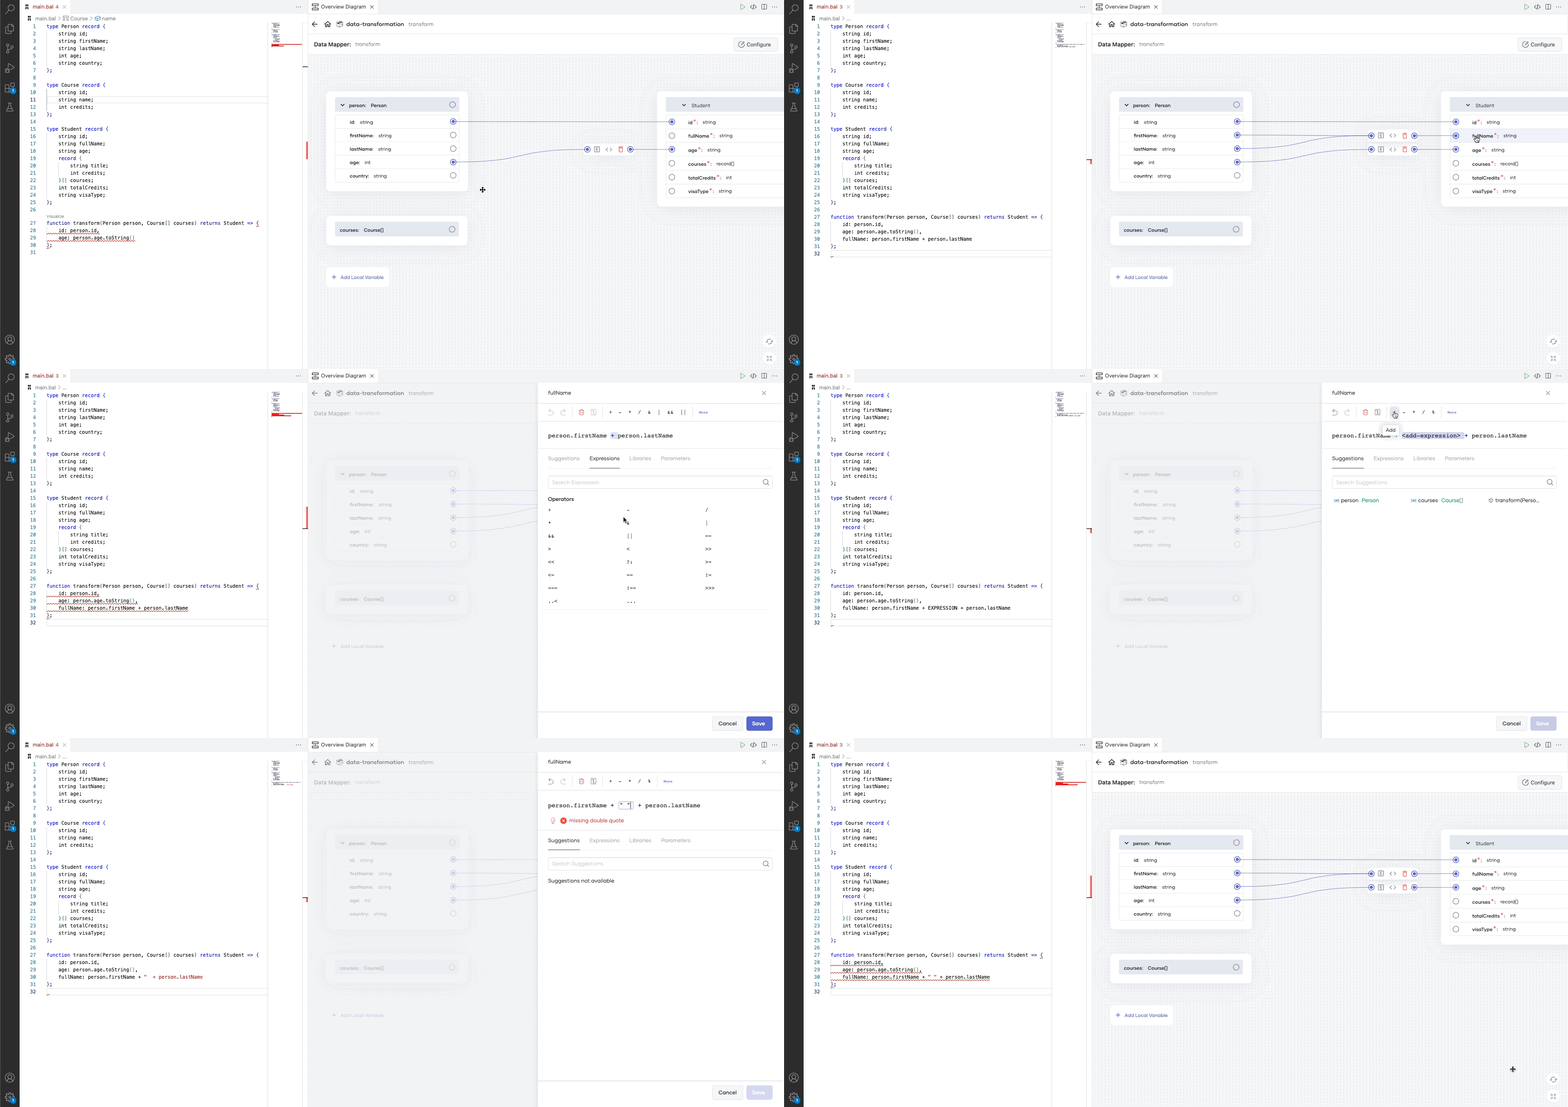
You can derive one output parameter by combining two or more input parameters. In this example, the value of the fullName output parameter is a combination of the values of the firstName and lastName input parameters. You can map them as shown below.
Info: To aggregate fields, you can map two or more fields to the same output field. The Data Mapper will automatically combine the two fields and assign them to the output field. By default, the fields will be combined with a plus operator. If you want to use a different operator or method to combine two fields, click the Code button and customize the expression using the expression editor.
Map the arrays
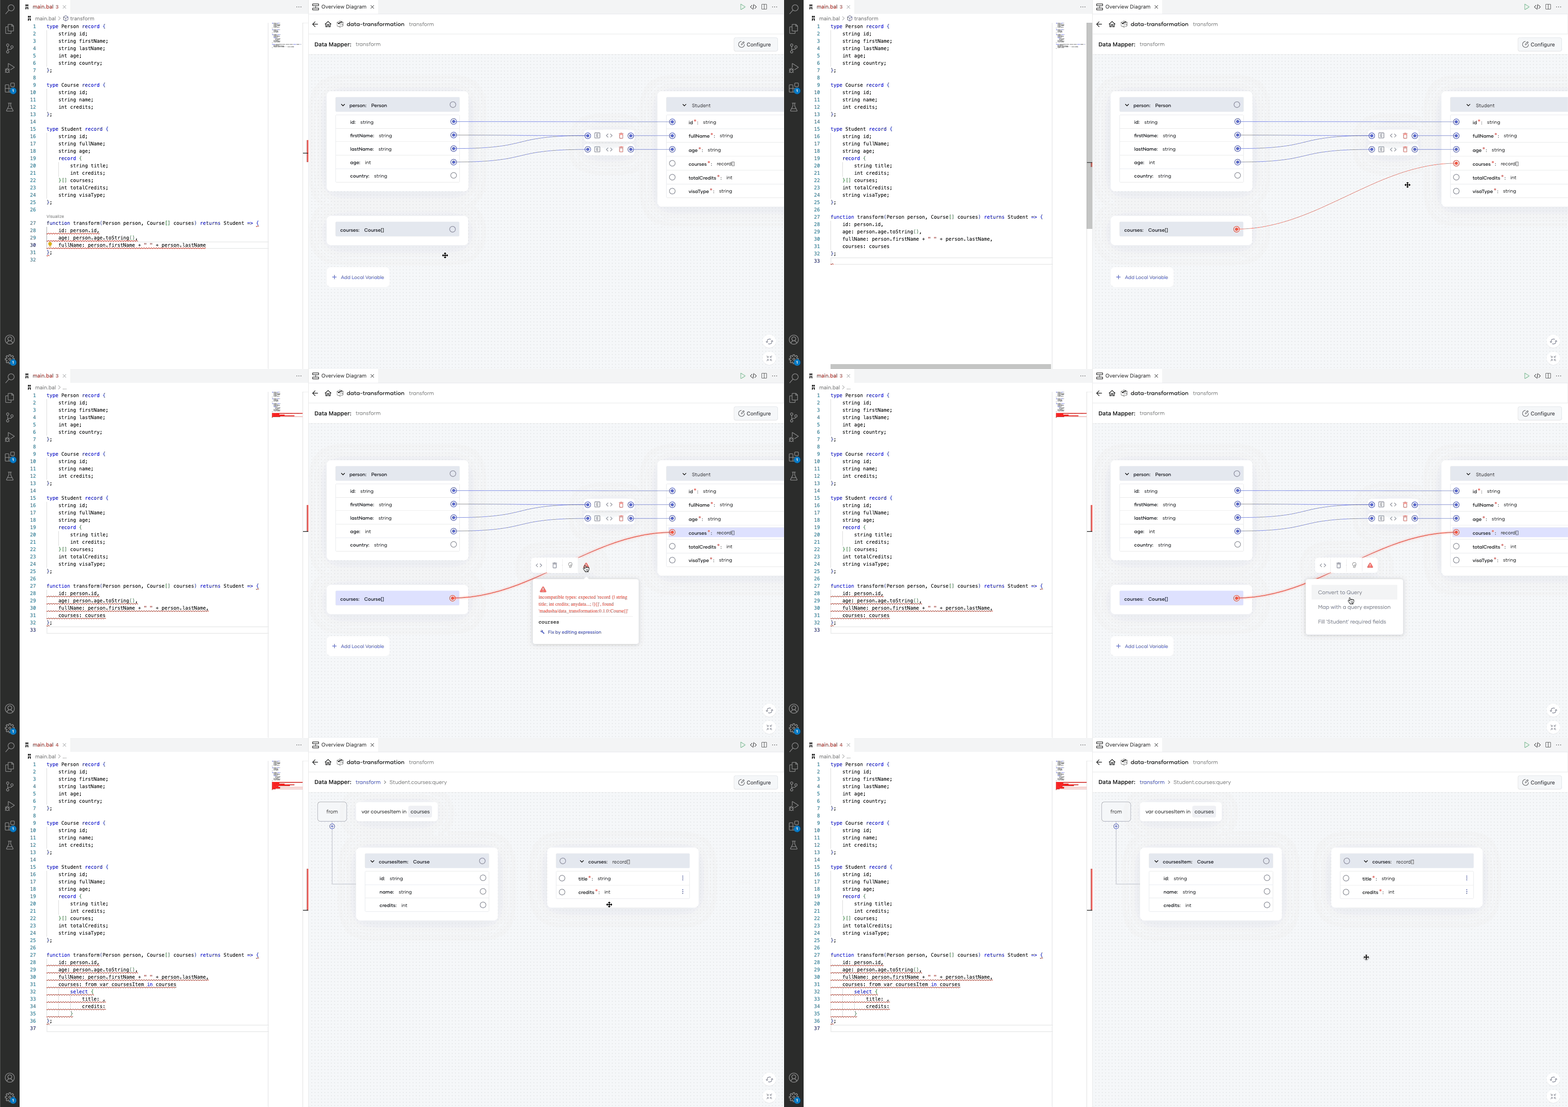
To convert from one array type to another, map the input array to the output array. If the arrays are compatible, they will be connected with a blue line. If they are incompatible, the connecting line will appear in red.
Info: You can use the Ballerina query support to convert one array type to another. To use a query in a Data Mapper, select the array by clicking on it. Then, it will provide you with several buttons. Click the code action button (bulb sign) and select Convert to query. Then, the Data Mapper will convert the mapping to a query. Next, move into the query and do the mapping between the array types.
Process the data further
You can further process the data within the query expression. Currently, the Data Mapper supports the following intermediate clauses.
| Clause | Description |
|---|---|
Where | Filter data based on a given condition. |
Let | Define local variables within the query expression. |
Limit | Limit the number of elements returned from the query expression. |
Order by | Sort data within the query expression in ascending or descending order. |
Join | Perform an inner join. |
Outer join | Perform a left outer join. |
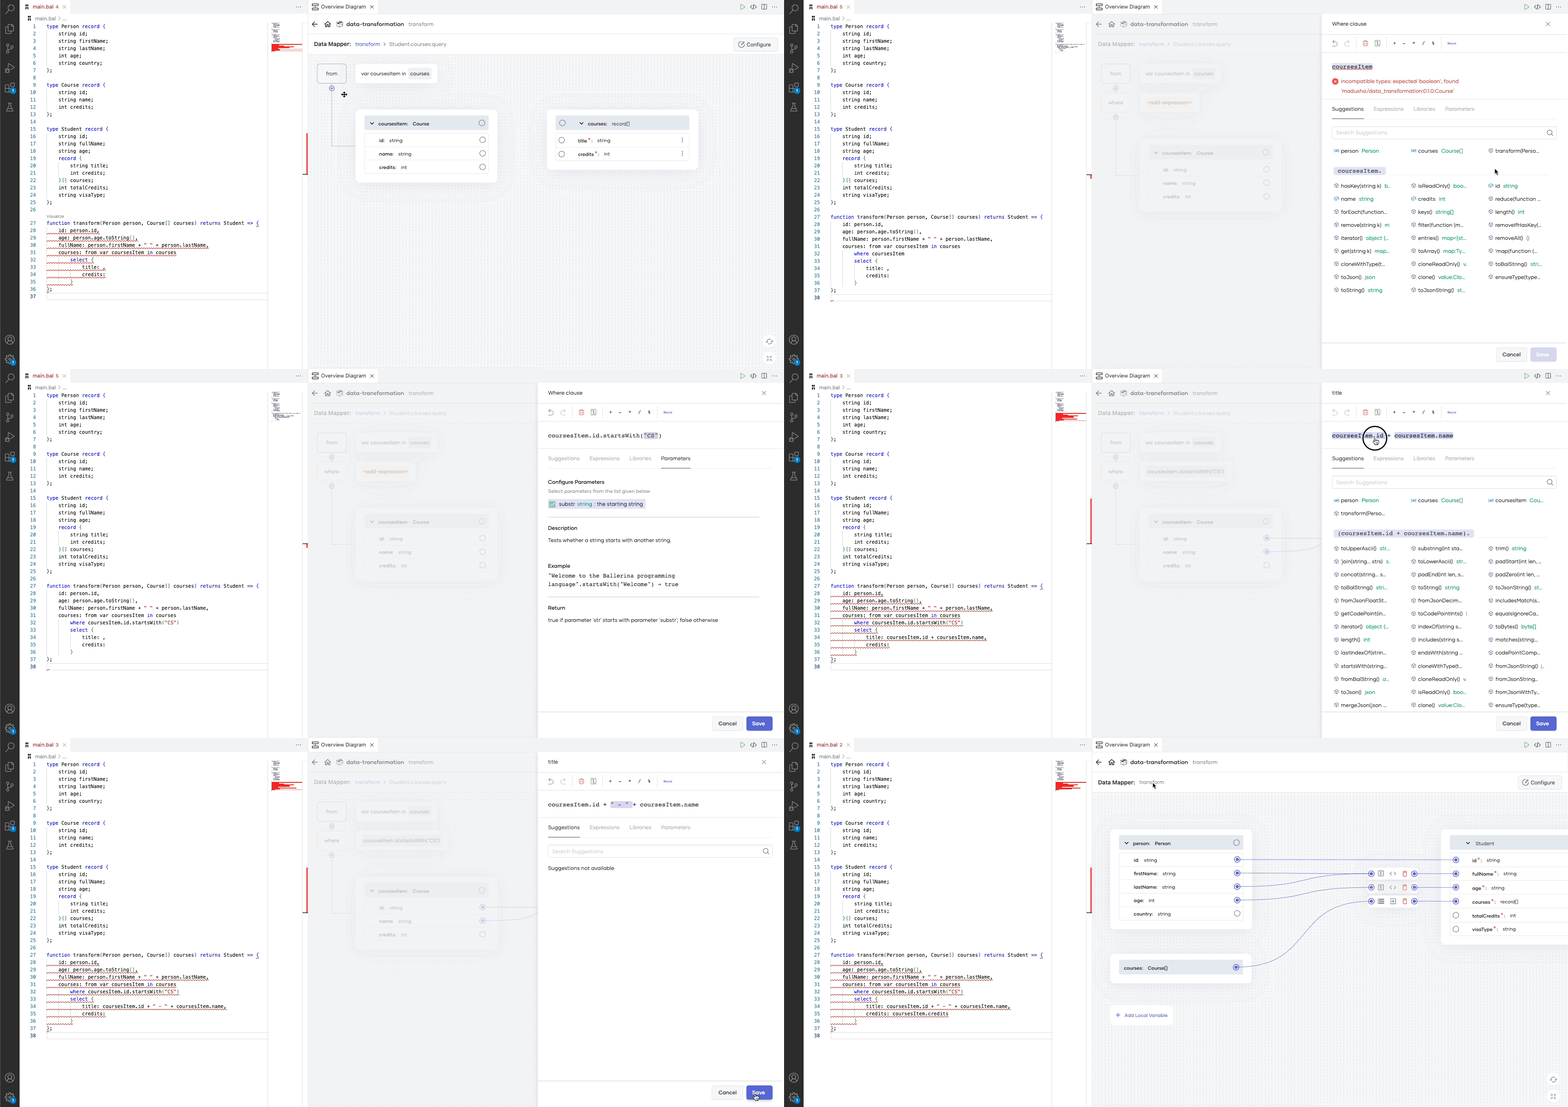
Once the array type mapping is completed, select the transform function name in the top breadcrumb bar to navigate to the root view of mapping.
Add local variables
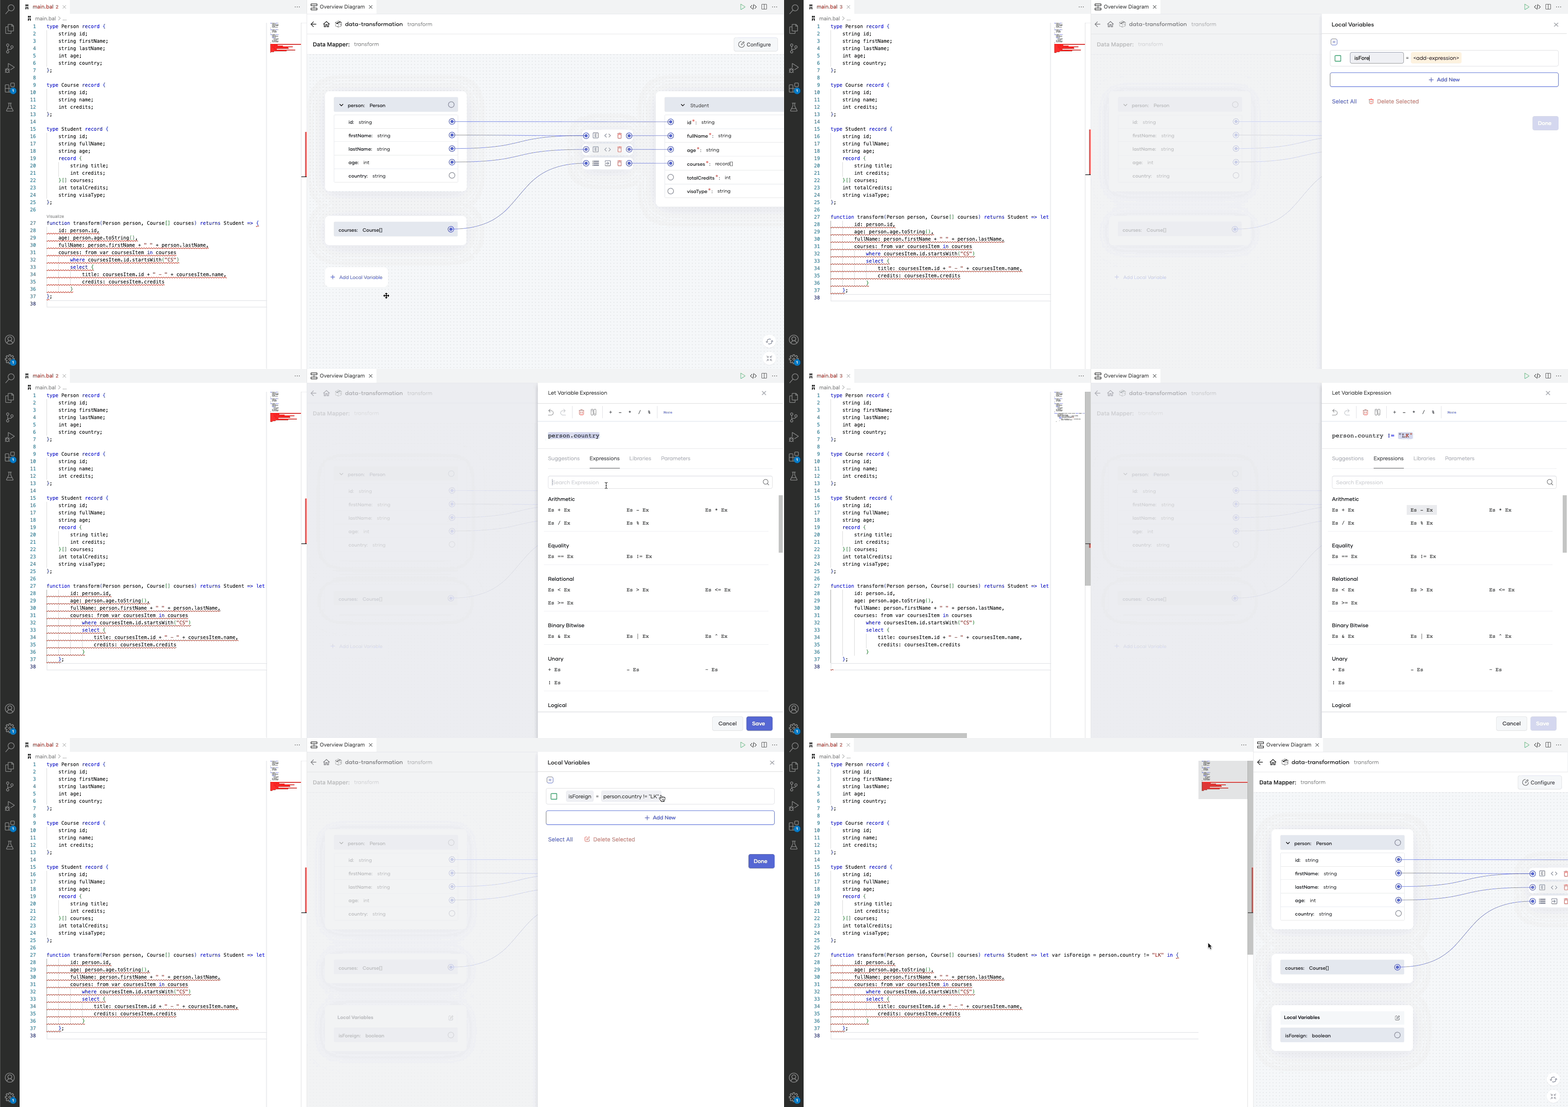
You can define local variables within the transformation function and reuse them in multiple places to avoid duplications.
Info: If there are no existing local variables, click the Add Local Variable button to open the local variable pane. Otherwise, the defined local variables are listed down under local variables in the RHS of the UI. Click the Edit button there to access the local variable pane.
Manipulate fields without drawing connections
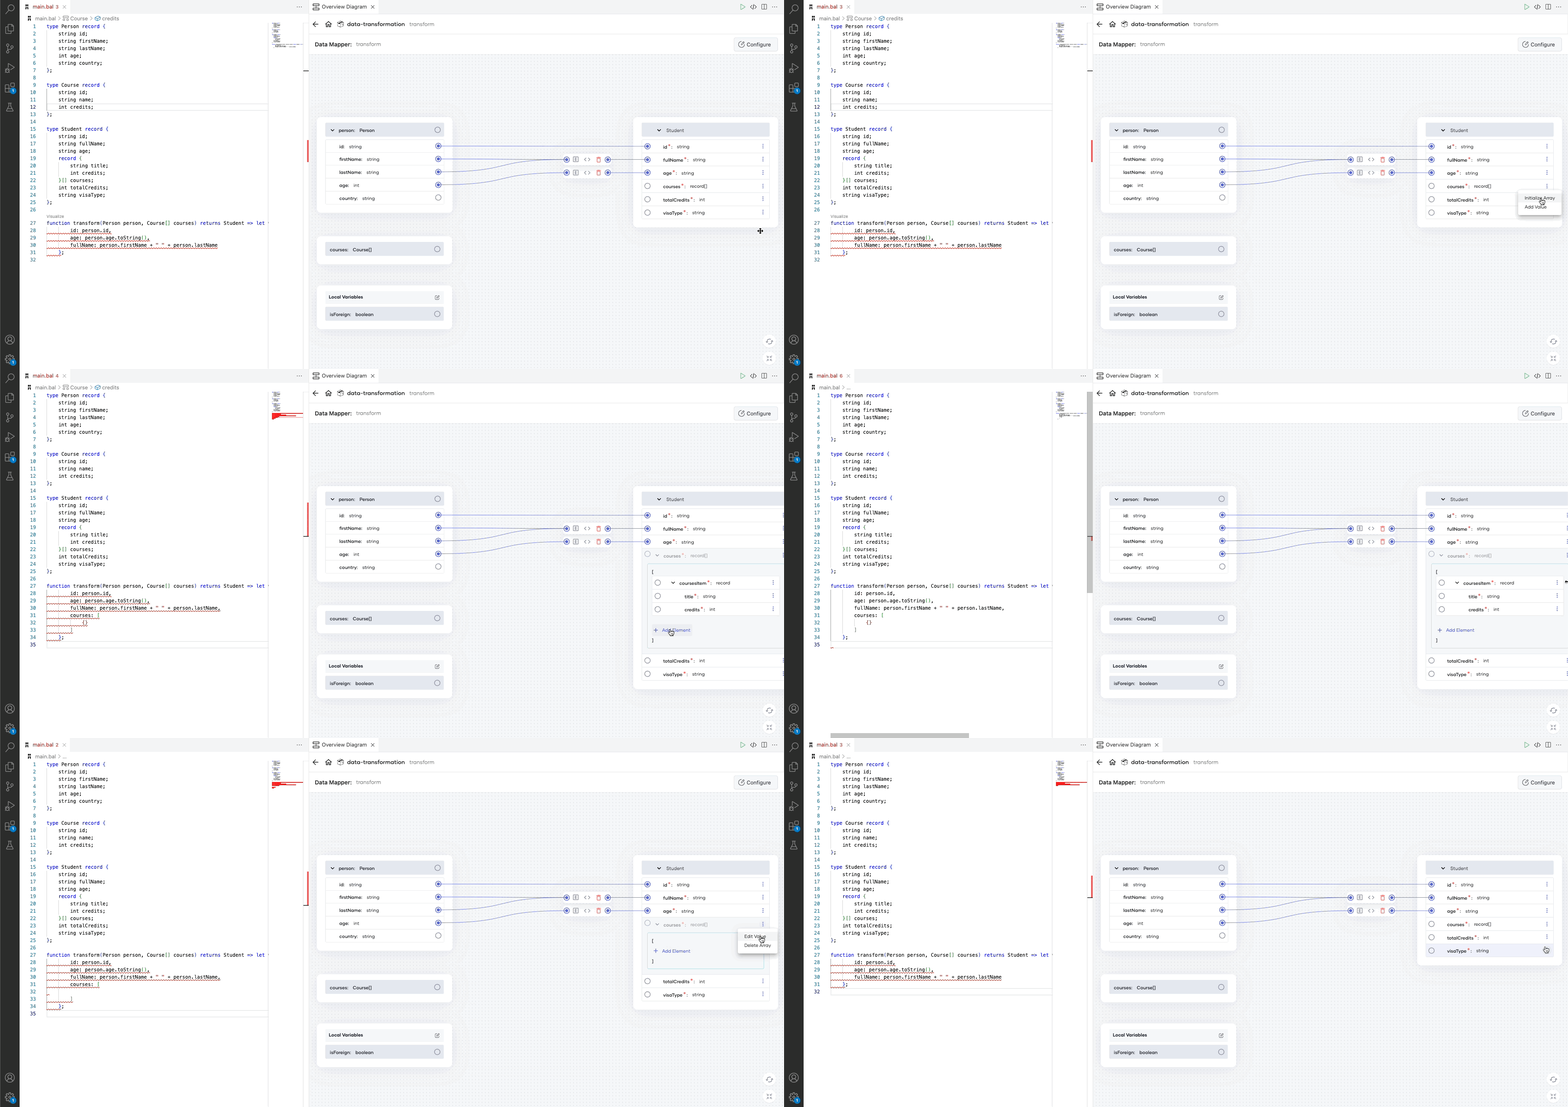
Click the triple dots button at the end of the field to see the actions that can be performed for the selected field.
Initialize arrays, add and delete elements
Info: The actions are provided based on the type of the selected field. If you click on the triple dots button of an array-typed field, you will see the Initialize Array option.
Once the array is initialized, click the + Add Element button to add the array elements. Furthermore, click the triple dots button on any array element to get the option to delete that element.
Add/Edit constant values/expressions
Info: If a particular field is empty and accepting a constant/expression, you will see the Add value action after clicking the triple dots button. This will open up the expression editor. You can provide a constant value or construct any complex expression via it.
-
Add a hard-coded visa type for foreign students.
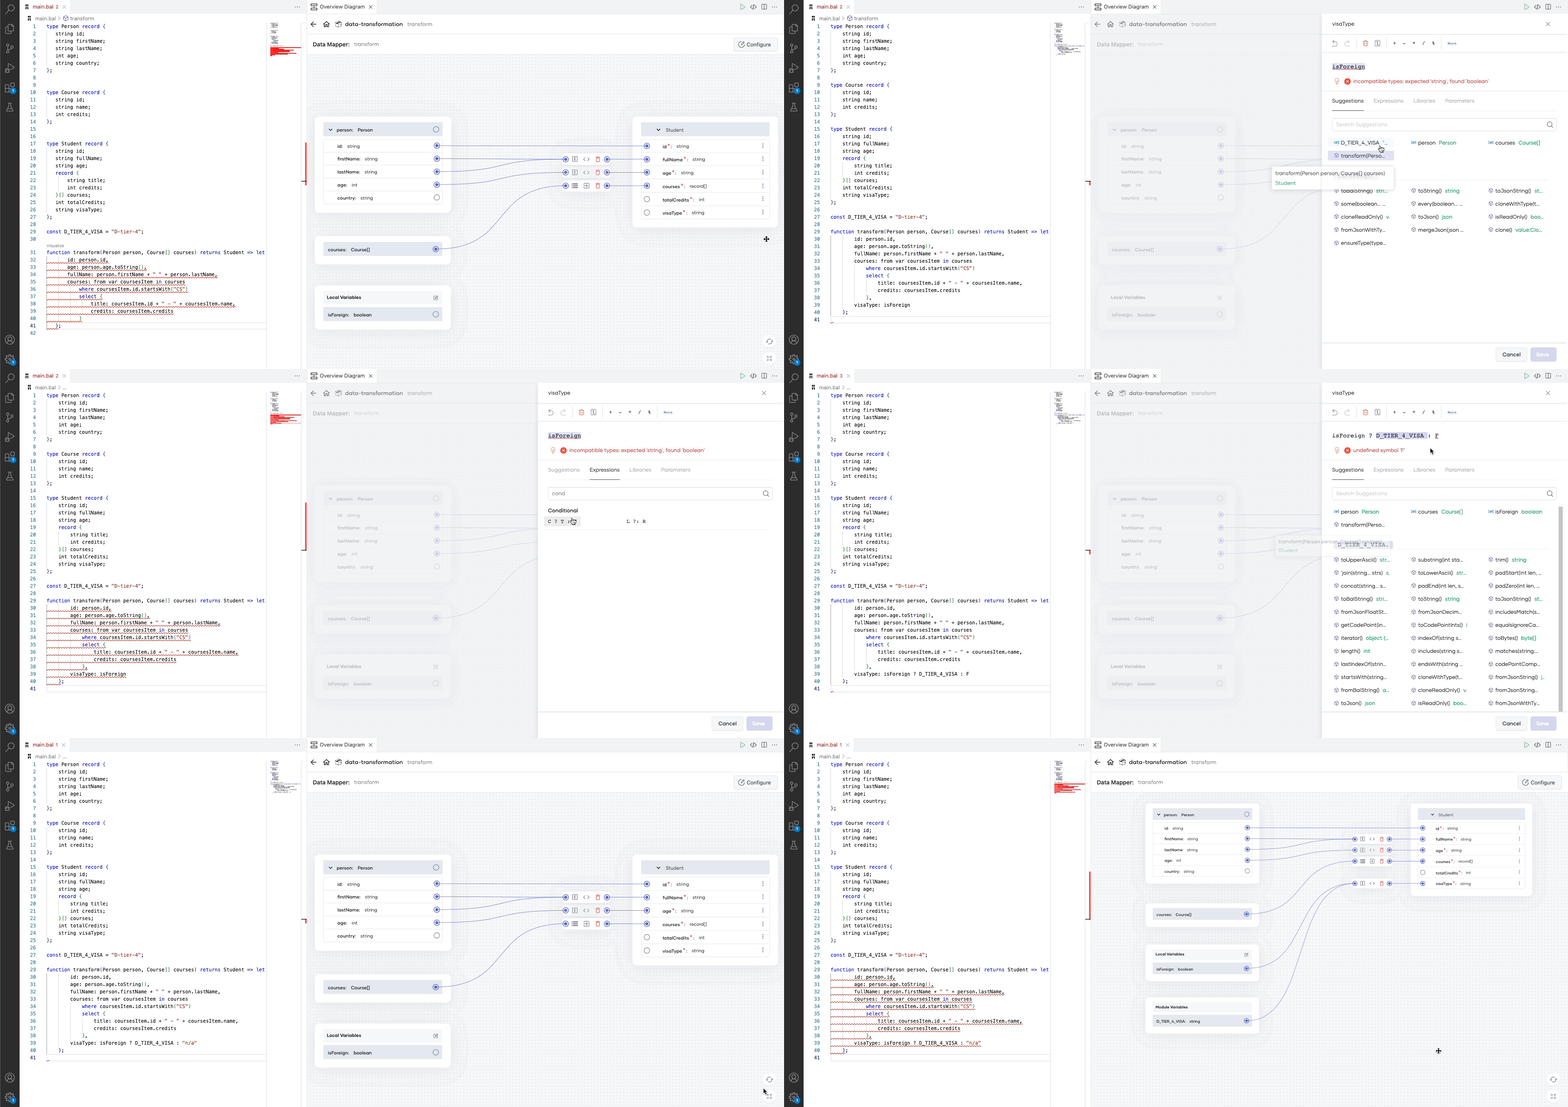
Info: If a particular field is having a value, you will see the Edit value action once you click the triple dots button.
-
Add an 'F' suffix to the
student idof each foreign student.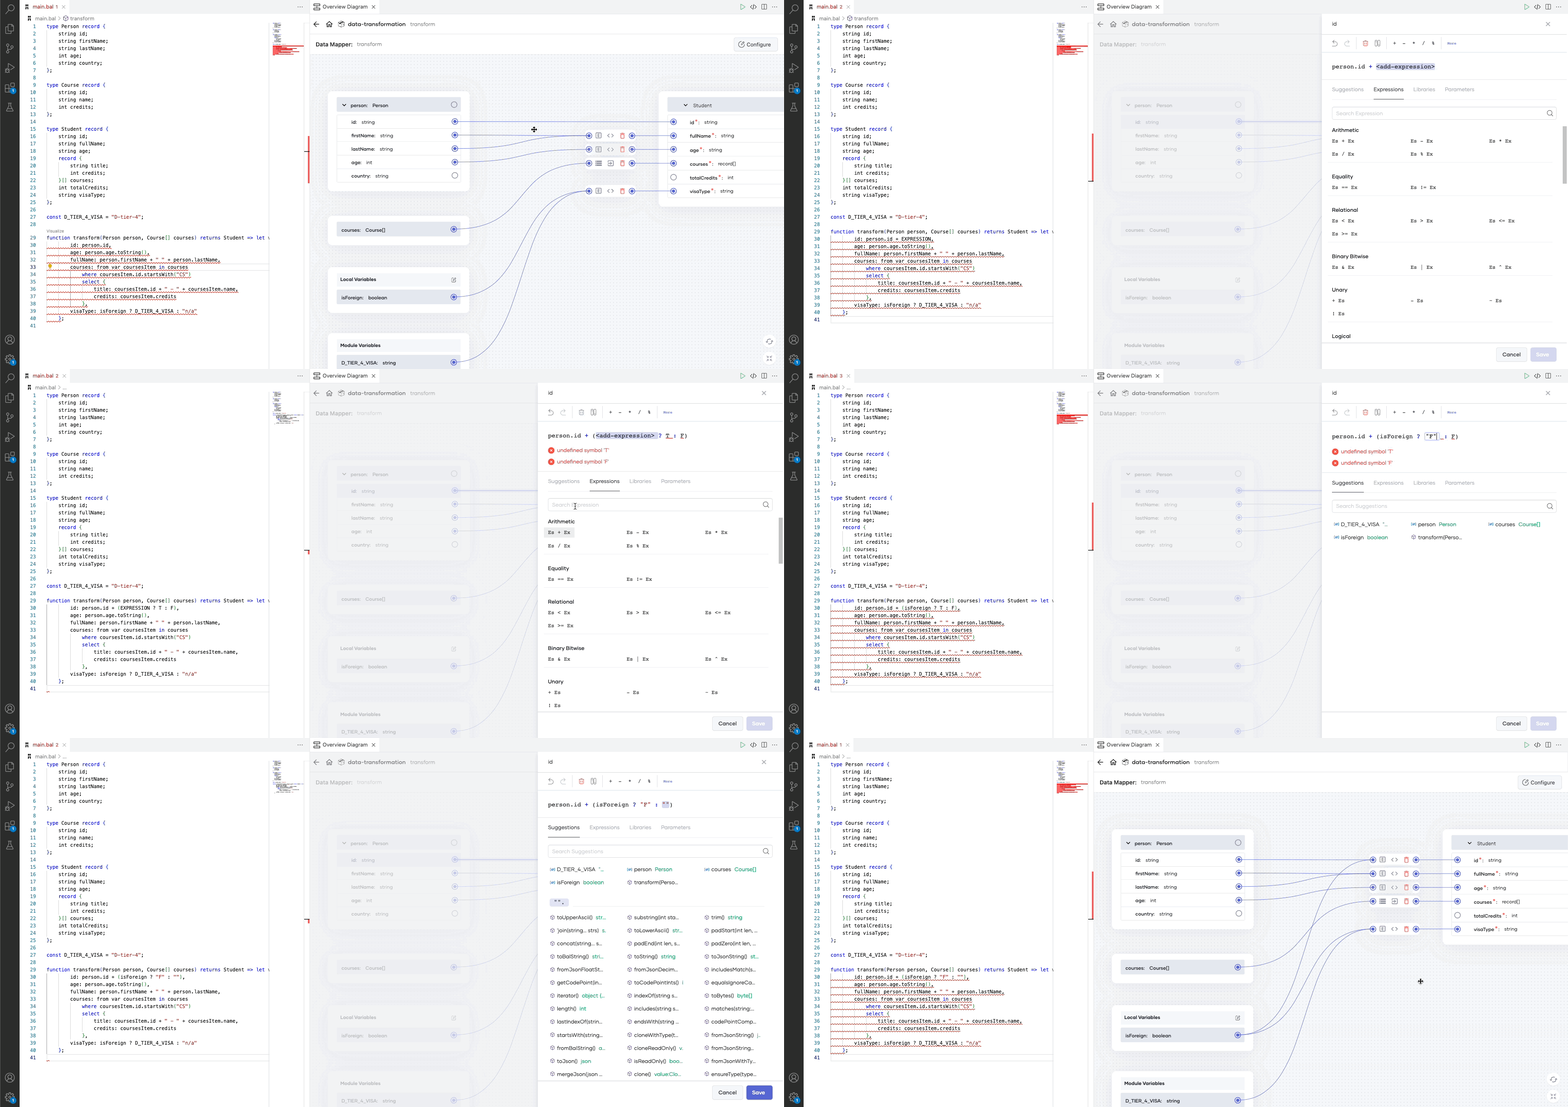
-
Fill in the
totalCreditsfield by getting the summation of the credits in each CS course.Tip: You can use the
reduce()array function for this by passing the combining function below to get the sum.var totalCredits = function(int total, record {string id; string name; int credits;} course) returns int => total + (course.id.startsWith("CS") ? course.credits : 0);
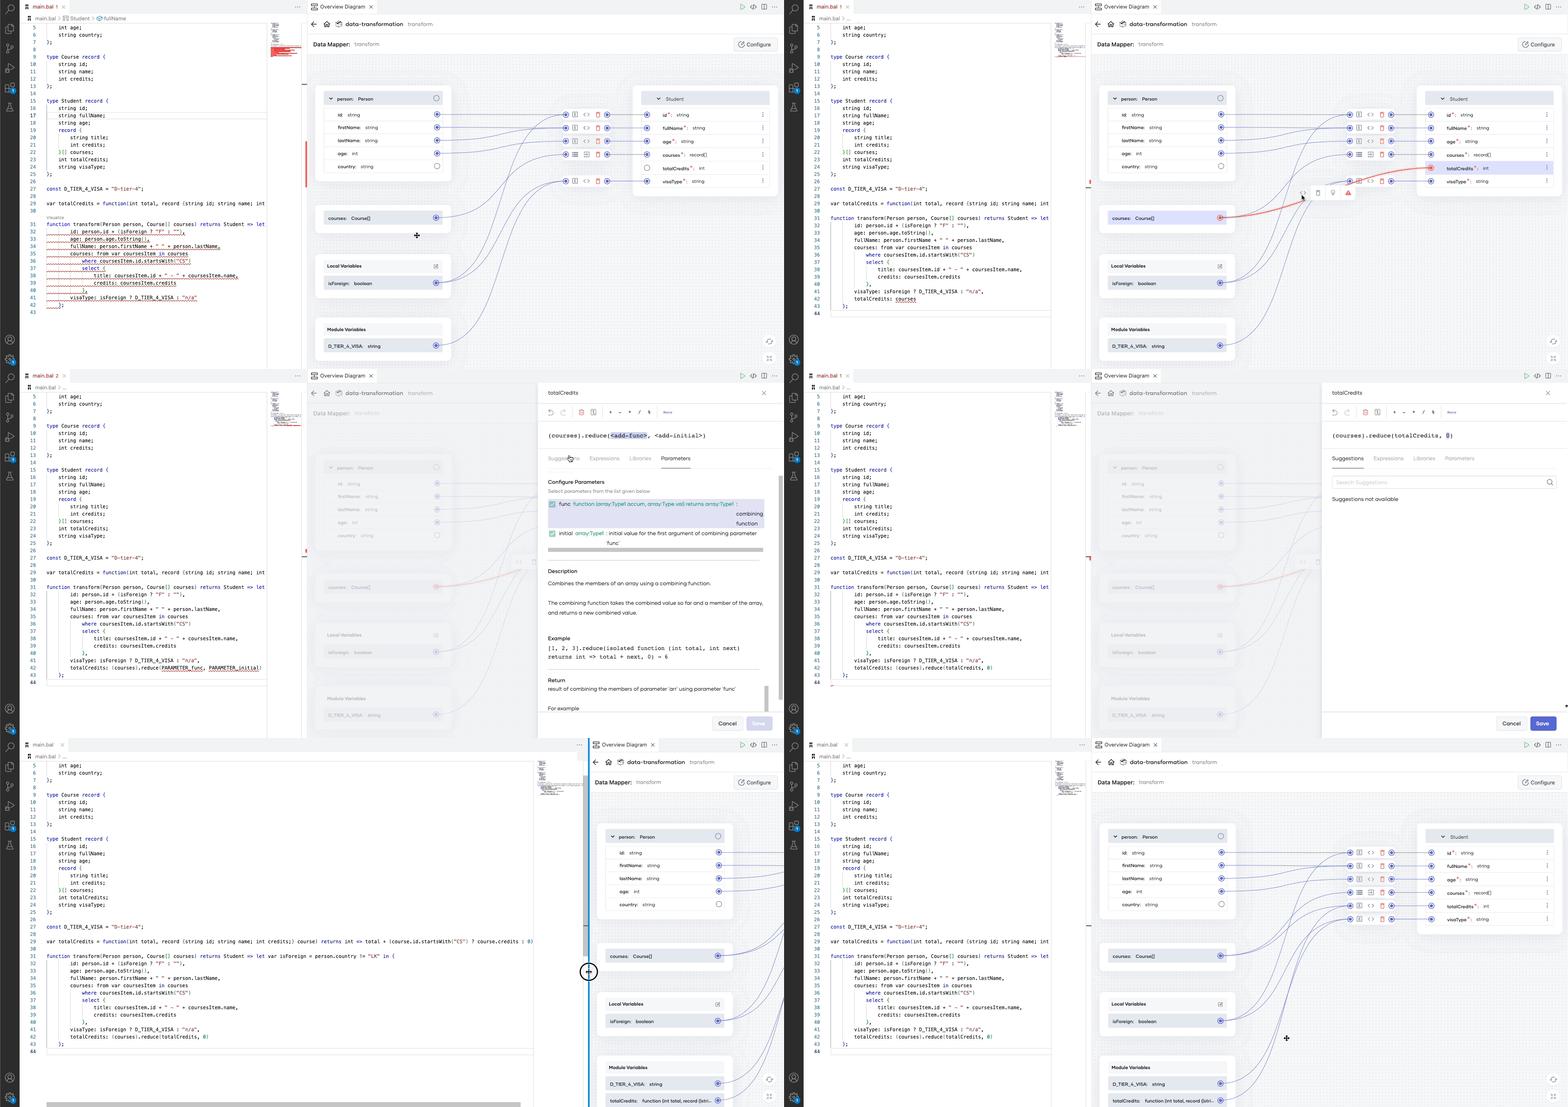
Now, you have successfully configured the transformation function using the Data Mapper.
Automatic Datamapper (Experimental)
With this experimental feature, you can automatically generate simple mappings between the input and output records.
Info: The mapping expressions in the expression-bodied function are automatically generated through an API call to a LLM.
Logging in to Ballerina Copilot
To use the AI-assisted mapping, you must log in to Ballerina Copilot. If you haven't done so already, you can either log in using the command palette or click on the automap button, which will redirect you to the login page.
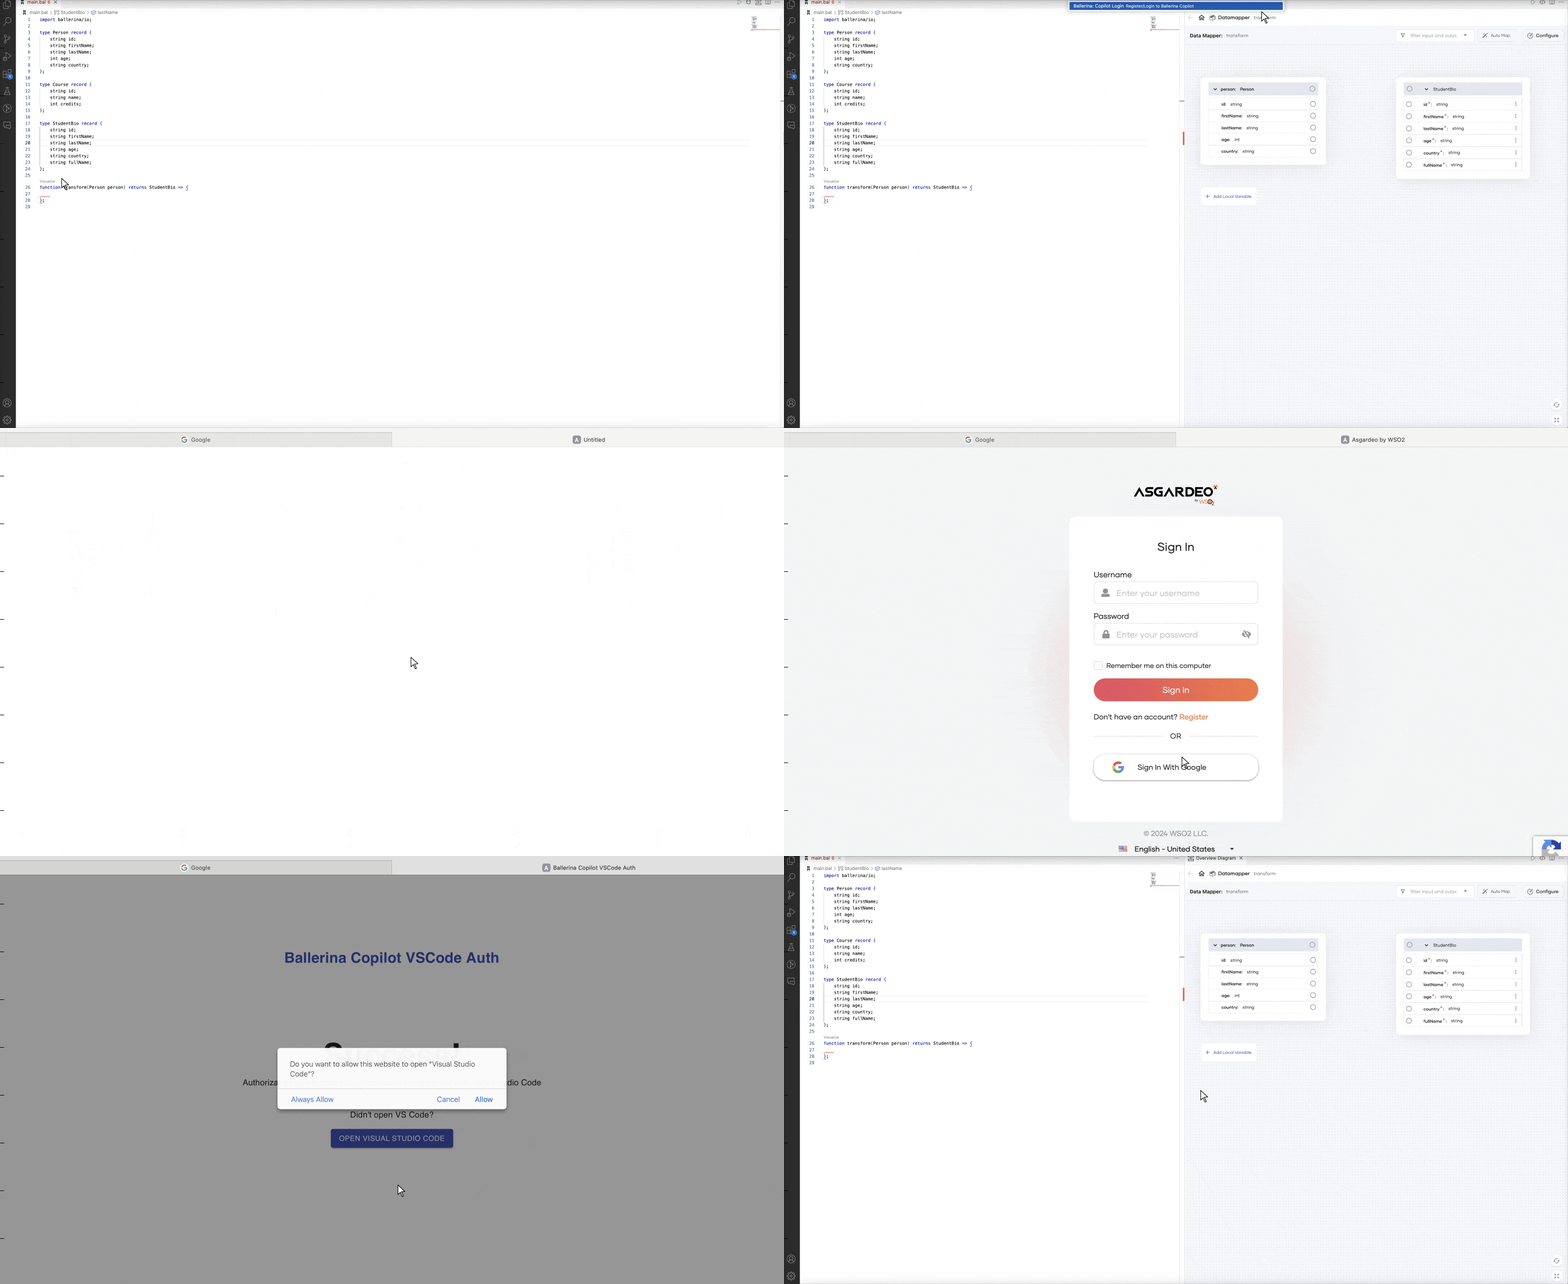
Generating the AI assited mappings
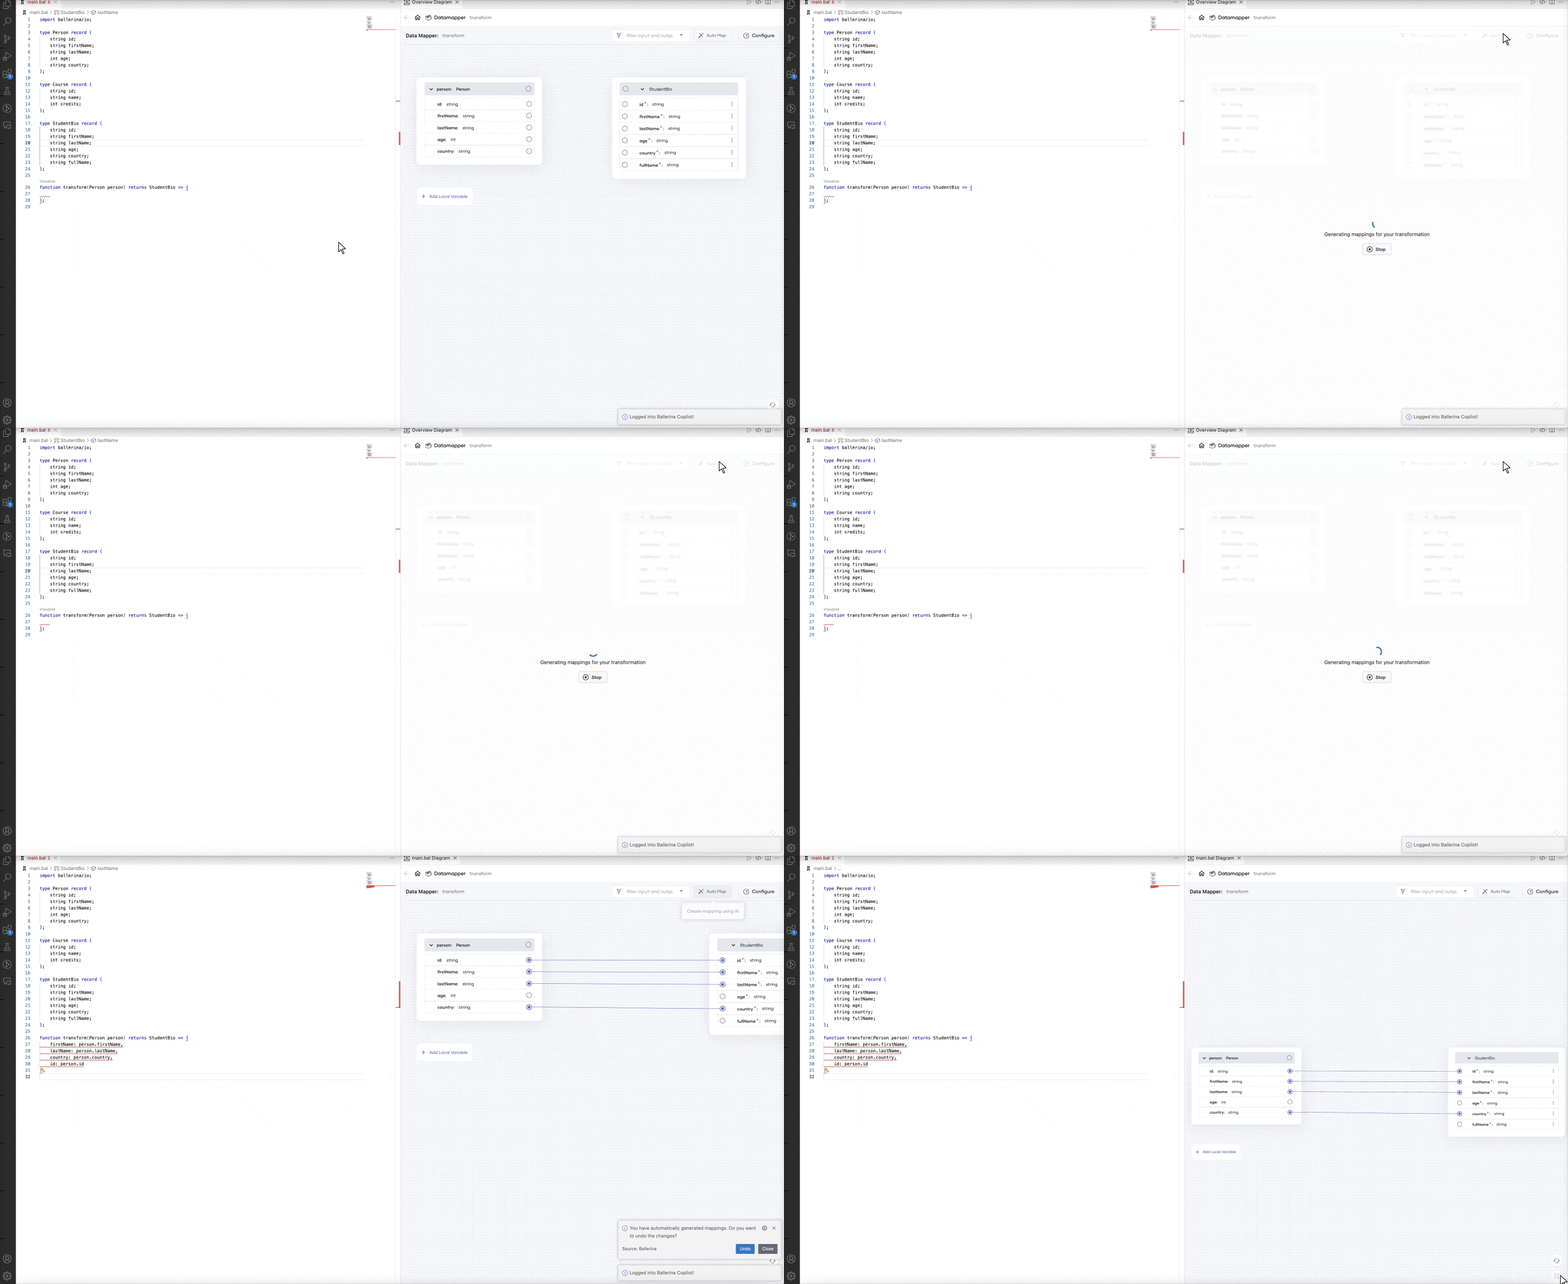
After properly logging in, you can use the Auto Map button to map the fields in the expression-bodied function.
Info: In this experimental release, the AI-assisted mapping only supports basic mappings. In future iterations, we will be expanding it to cover more complex scenarios.
